
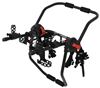
Stealth Hitches Hidden Trailer Hitch Receiver w/ Towing Kit - Custom Fit - 2"
(3 reviews)
Price: $967.00
Stealth Hitches Hidden Trailer Hitch Receiver w/ Towing Kit - Custom Fit - 2"
Item # 391AUDQ818T
Our Price: $967.00
Will this fit?
To see if this custom-fit item will work for you please tell us what vehicle you'll use it with.
In Stock
Thank you! Your comment has been submitted successfully. You should be able to view your question/comment here within a few days.
Error submitting comment. Please try again momentarily.


- All Info
- Reviews (3)
- Q & A (0)
- Videos (2)
- Photos
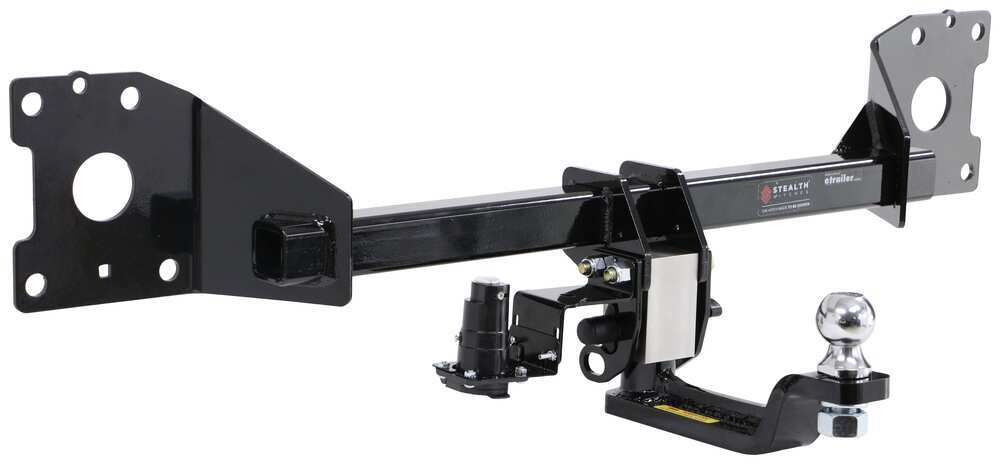
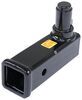
Stealth Hitches Trailer Hitch - 391AUDQ818T
- 2 Inch Hitch
- 8000 lbs GTW
- Completely Hidden
- Stealth Hitches
- 800 lbs TW
- Custom Fit Hitch
Tow your small trailer with this completely hidden trailer hitch. Remove the ball mount for a fully concealed look when you're not towing. Use the included receiver attachment to mount a bike rack or cargo carrier. Trailer wiring included.
Features:
- Custom-fit trailer hitch lets you tow a trailer, carry a bike rack, or haul a cargo carrier with your vehicle
- Insert included ball mount to tow a small trailer
- Attach included receiver to mount a bike rack or cargo carrier
- Totally hidden design offers a clean, from-the-factory look
- Cross tube is concealed behind your rear bumper
- Receiver or ball mount detach with no tools and can be stowed away when not in use
- Sturdy center block allows secure mounting and easy removal of attachments
- Tight tolerances prevent jarring back-and-forth movement when you're starting and stopping
- Integrated lock protects the attachment from theft
- Durable stainless steel construction resists corrosion
- Hitch won't affect ground clearance or block your trunk's foot-access sensor
- Simple, bolt-on installation - no drilling or welding required
- Uses existing connection points to protect your vehicle's crumple zones
- Black powder coat finish offers superior rust protection
- Meets SAE J684 towing safety regulations
- 7-Way, blade-style connector mounts beneath hitch to power your trailer's signal lights
- Connects directly to power supply to avoid overloading vehicle's electrical system
- Made in the USA
Specs:
- Receiver opening: 2" x 2"
- Maximum gross trailer weight: 8,000 lbs
- Maximum tongue weight:
- When used with 2" receiver attachment: 600 lbs
- When used with ball mount: 800 lbs
- Not rated for weight distribution systems
- Ball size: 2"
- Rise from ground to top of ball: 18"
- Ball mount length (from center of ball to center of peg inserted into hitch block): 10"
- Ball hole diameter: 1"
- Limited lifetime warranty
Note: The included receiver attachment is only for hitch-mounted accessories and cannot be used for towing. To tow with this hitch, you must use the included ball mount attachment.
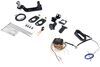
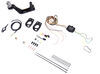
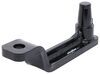
This Stealth Hitches trailer hitch includes everything you need to hook up your trailer for towing. The ball mount pops into the hitch's center block so you can attach your trailer's coupler to the hitch ball. The wiring harness lets you power your trailer's lights. And the safety chain loops let you attach your trailer's safety chains. A receiver attachment is included as well for those times you need to use a bike rack or cargo carrier instead of towing your trailer. This all-in-1 solution saves you the headache of scrambling for missing parts, so you can get on the road faster than ever.
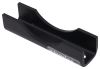
Completely Hidden Design
Nothing can ruin the clean, stylish look of your vehicle like a giant piece of metal bolted beneath the bumper. Luckily, with the Stealth Hitches trailer hitch receiver, you never have to worry about messing up your vehicle's lines.

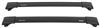
This hitch installs behind your bumper, keeping the cross tube concealed and leaving only the ball mount visible. Even better, the ball mount can be easily removed from the cross tube when it's not in use, so you won't see any trace of the hitch. This means that you can retain that clean, from-the-factory look for your ride, while still being able to tow your trailer on the next family road trip.
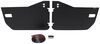
This hitch also comes with a removable 2" square receiver, which can be used to mount any variety of hitch accessories, like your bike rack or cargo carrier.
Simple Set Up
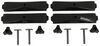
Both the ball mount attachment and receiver attachment can be installed and removed in seconds with no tools required. Simply pop the selected attachment's base up into the stainless steel block at the center of the hitch until it automatically latches in place.

Be sure to then press the lock on the side of the block to fully secure the attachment. When you're finished hauling, use the included key to unlock the latch. Then turn the handle on the block clockwise and remove the attachment. You can stow the attachments in a safe place like your vehicle's rear cargo area, or you can use a convenient carrying case (391CASEC - sold separately).

And when you're not using an attachment, the included hitch plug covers the center block's opening to protect the hitch's body from dirt and debris.
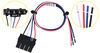
Wiring Installation
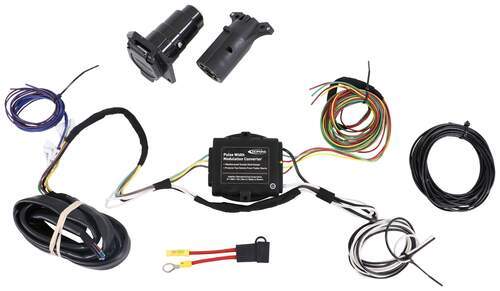
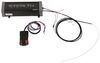
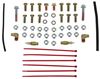
The included wiring splices into your vehicle's wiring harness, which is located in your rear cargo area, on the driver's side. Once you've made all of the necessary connections, insert the provided fuse into the in-line fuse holder.
Once installation is complete, the 7-way connector will mount beneath your hitch. A mounting bracket is included to attach the connector to your hitch.

It is recommended that you use a small amount of grease on all electrical connections - the plugs on your automobile and the 7-way connector itself - to help prevent corrosion.
etrailer.com Technical Support
At etrailer.com we're committed to the products we sell, and to our customers. Our experienced and knowledgeable staff are available via both phone and email to address your questions and concerns for the lifetime of your hitch. The technicians at etrailer perform hitch installations on a daily basis, making them a valuable resource for do-it-yourselfers. The one-on-one, personal service you'll receive comes straight from an expert in the towing and automotive field. We've installed it, we've wired it, and we've towed with it, so whatever your question, we can answer it.
SHR30016 Stealth Hitch Hidden Receiver Rack Package - Custom Fit - 2"
SHT25010 Stealth Hitch Hidden Trailer Hitch Towing Conversion Package - 2" Ball
Installation Details Alternate Instructions
This Product Fits The Following Vehicles
- 2020 - 2024 Audi Q7
- 2019 - 2023 Audi Q8
- 2024 - 2024 Audi Q8 e-tron
- 2020 - 2024 Audi SQ7
- 2020 - 2024 Audi SQ8


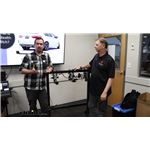
Video of Stealth Hitches Hidden Trailer Hitch Receiver w/ Towing Kit - Custom Fit - 2"

Videos are provided as a guide only. Refer to manufacturer installation instructions and specs for complete information.


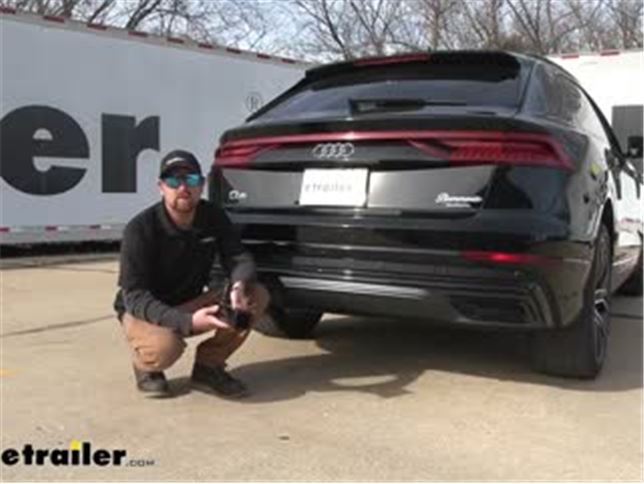
Video Transcript for Stealth Hitches Hidden Rack Receiver Installation - 2019 Audi Q8
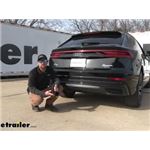
Hey everybody, Ryan here at etrailer. Today on our 2019 Audi Q8 we're gonna be showing you how to install the stealth trailer hitch receiver. But before we get into that, why don't we just check this out and make sure it's gonna work for you. The main thing that this hitch is gonna do is remain completely hidden whenever you're not using it. So when you're just driving around town not wanting to use an accessory your vehicle will completely factor, you're not even gonna be able to see the hitch at all. Which is definitely a good thing on a vehicle like the Audi, they look really sharp and personally if I could get away with doing that, that's the path that I would go.
But with that said, when you are ready to use it the receiver tube is gonna be detachable, all right And then up underneath the vehicle this is how you get to the hitch. So there's a small cut out here that will create when you install this. The tube is just going to kind of push up into place. So we'll make sure you have your handle turned there, it'll slide right up and lock in the position. Once the tube is kinda locked in there now you're gonna be able to use accessories which kind of brings you to my next point.
With this particular setup, it's only designed to be used with accessories, so bike racks and things of that nature. If you are wanting to do some towing, there is a towing kit available that has a different a special type ball mount to allow you to hook up your trailer as well as some wiring to kind of get you get you going in that regard. But the receiver tube, once you have it on, it's gonna come out a little ways and I think that's beneficial especially being designed for those accessories, it's gonna give you plenty of clearance. One of the big questions that a lot of people wonder is if you put a trailer hitch back here is it gonna interfere with your hands free lift gate assist And with this one the answer is no. Even with the receiver tube in you're still able to kick your foot under there and have the hatch open up like it should.
The receiver tube is gonna have a two inch by two inch opening and a reinforced collar for extra strength. This is a super common size and a lot of stuff's gonna work with it. If you already have a smaller inch and a quarter by inch and a quarter accessory and you're wanting to hold onto it, you can actually pick those size receiver tubes up separately as well. And since these do pop out if you want they also offer carrying cases to keep these all cleaned up and put away and organized. So just figure it out, throw that out there.
It is going to use the standard five eights pin and clip. Keep in mind though, one doesn't come with the hitch. If you need one, you can grab it here at etrailer. And something to think about, since this can only be used with accessories a lot of times if you pick one up new they're gonna come with one included, so just keep that in the back of your head too. As far as how much weight the hitch can handle it's gonna be pretty high. Maximum gross tongue weight rating's gonna be 800 pounds. That's gonna be the amount of weight pushing down on the hitch. So with that, with that capacity there you shouldn't really run into any issues using just about any size bike rack or cargo carrier. Now we can grab a couple of measurements and these will help you figure out what type of accessories will work best. If you go from the ground to the top inside edge of the receiver tube opening it's gonna be about 15 and a half inches. So if your accessory has a straight shank or one that has a rise in it, that'll work out just fine. From the center of the hitch pin hole to the edge of the rear bumper, that's only gonna be about an inch. Didn't talk about this earlier but you can use that to help figure out that if any folding accessories you might have can be sort in an upright position without hitting the back of your Audi. Other than that, at the end of the day good fit for the Audi, you know especially using those types of accessories, it's gonna be a clean factory type way to do that. And like I said before, if you're trying to do some towing you can always check into that towing kit. As far as the installation goes, believe it or not it wasn't too bad, it was much easier than I was anticipating. The fascia does have to come off, but there's only a handful of fasteners that you have to take out and really no crazy tools or anything like that. Just take your time, be careful, you know, a lot of plastic so just stay patient. But if you plan on doing it yourself and you'd like to follow along, feel free to hang around, we'll go ahead, pull it into the garage and put the hitch on together now. To begin our installation we're gonna be here at the back of our Audi and we're gonna have to remove the fascia so let's gonna start with getting the taillights out. So there's gonna be these plastic covers here that we need to remove to expose some of the fasteners underneath. And you can take a plastic trim tool like this, just kind of carefully, kind of work your way around it until it pops off. That'll let us get to a couple of bolts here. And I wanna mention from this point on anything we do to one side of the vehicle, we're also gonna do to the other side cause it'll be set up the same way. These screws we are gonna remove, we'll use a T 25 torx bit. And when you go pull these out be careful you don't want to drop 'em. So I'm just gonna take a magnet there, be on the safe side, pull that out. We can set that stuff to the side here. And as far as getting our taillight out, you can kinda work it back and forth. And what you might need to do is take a plastic trim tool there. I'm gonna get in behind there to release it and once it's released we can unplug it. So there's a connector and you can just push down on that tab and separate it and we'll set our light off to the side. With the taillight out of the way that'll give us access to another fastener here, which is that screw there. And we'll come in with our T 25. Looks like you might be able to use a flathead screwdriver on these two, but we'll go with our torx bit and get this pulled out. Moving underneath the vehicle now just behind our rear tire along this edge, we're gonna have four fasteners. Again a T 25 torx bit. We'll get all these removed. Moving towards the middle of our vehicle we're gonna have four more fasteners and we'll just use our same T 25 to get 'em all out. Moving to your wheel while now along this edge we're gonna have two torx bit screws. Once both of those are out you can kind of grab a liner here if I can get a hold of it. I'm just gonna kind of peel that back up a little ways and then that will expose another torx bit. So right there, right in between the two that we just, just pulled out. What I've done now is use some painters tape along the scene here and everywhere that we're gonna be working just so we don't accidentally scratch anything, but we're gonna have to pop this piece of trim off. I don't think we'll have to take it off completely, more or less maybe about halfway. But you can take a trim tool, and just is very carefully trying to start to work your way around here and it pops off pretty easy. And that's going to expose a couple of fasteners under here that we can get removed. Our two fasteners will be right here Like that, popped out. Then the next one will be located down here. Now with an extra set of hands we can get our fascia removed. So on each side of it you can kind of grab it and this is just gonna pop out essentially. This one seems to be coming off pretty good. It's just held in place with some, some plastic clips. If it gets hung up what you can do these little keepers here you kind of push down on 'em and that'll help release it. Okay, we'll just kind of continue to work our way across here. And once it's free don't pull back too far, we may have some electrical connections we need to remove. Looks like over on the driver's side you may have one. Come to find out you do not want to disconnect this wiring, all right But there's some clips kind of holding it in place. You can pull back on a few of 'em just to give us some extra space here. But what we're gonna try to do we're gonna leave it attached and just kind of set it on a cart while we're working on the hitch. Now we're able to remove our bumper beam. So we're gonna have a total of four bolts. Two up top. I'm using an 18 millimeter to get these removed. We wanna hold on the hardware before we use it. I already took the other side took the other bolts off the other side. But we can remove our bumper beam and we will not be reinstalling this piece. Now we can grab our hitch and put it in the position and essentially this is just replacing our, our bumper beam there. It's gonna take all of that factory hardware and I'm gonna get 'em all started hand tight. That way the hitch will support itself., we can make sure it's centered and then we can come back and tighten 'em on down. I got 'em all started. And you can't really shift the hitch from left to right too much but you can go up and down. So I'm just gonna try to line it up and center it with that little stud there. Come back and snug them up with a 18 millimeter. And now we need to make sure to come back with a torque wrench and tighten down all the hardware to the amount specified in the instructions. When I'm doing these hitches I kinda like to make an X pattern. I feel like it just helps everything draw together a little more evenly. We can grab our latch block assembly deal here and get this bolted up to the hit. You want the handle side to be on the passenger side of the vehicle. Two holes in it are gonna line up with the two holes in the hitch. Take the bolts and saw 'em through and depending on what hit you got too, you know if you got the tow package one you might have some hooks and safety chain hooks you have to put here and other things so just keep that in mind. Yours might be a little different. But ours is just this so we'll get the hardware going here. To tighten these down I got a 1516 size socket and wrench. Of course, once you have these snug need to come back with your torque wrench and tighten 'em down into the amount specify. Now we're able to come over to our fascia and trim out what they call the gravel guard, so this spot on the bottom. We need to create the opening so you know the hitch will fit through and we can, we can get to it. So follow the instructions. They give you a diagram, so I tape that out here. I'm gonna use a dremel tool to cut some of this out and then I might switch over to another cutting device just to get on this along this edge cuz it's a little tight. But whatever you got will work you know whatever you see fit so go ahead and get this trimmed out. I got this piece trimmed out here and just to kind of clean everything up, you can come back with a utility knife or file something like that and clean up all the edges. With the fascia trimmed out now we can grab an extra set of hands and carefully reinstall and resecure it the opposite way that you removed. So I got the fascia all resecured. Went right back on with no issues the opposite way that we, we took it off. And with that done, that'll finish up our look at and our installation of the stealth trailer hitch on our 2019 Audi Q8..
Customer Reviews
Stealth Hitches Hidden Trailer Hitch Receiver w/ Towing Kit - Custom Fit - 2" - 391AUDQ818T
Average Customer Rating: 4.0 out of 5 stars (3 Customer Reviews)
Tow your small trailer with this completely hidden trailer hitch. Remove the ball mount for a fully concealed look when you're not towing. Use the included receiver attachment to mount a bike rack or cargo carrier. Trailer wiring included.by: Mark02/08/2024
Great after market Hitch! I have towed my jet-skis with ease. Living up to its name, this aftermarket hitch is truly hidden when not in use.
by: Richard01/02/2022
Summary: More gimmick than practical. Would recommend OEM/dealer hitch/wiring. (I later bought the OEM wiring harness.)
Our Audi Q8 did not have a hitch. The same day I bought the car, I placed the order for the Stealth Hitch.
Installing: Installation for the hitch receiver has instructions that are straight forward in my opinion, and I installed the receiver in just hours. The car bumper will need to be cut. HOWEVER, the aftermarket wiring parts and instructions were Awful. It requires wire taps to gain access to the signal from the car, which cuts into the insulation (I don't personally like). It's not the worst thing.
The worse was running the power wire from the back of the car to a battery terminal at the front of the car. While there may be alternatives, if you are following the instructions (there really aren't any for this part), you will struggle and have to make things up on your own, passing a 12 G +'ve wire past things with sharp edges.
Using: As the name implies, it's nearly invisible. I really like that the towing ball has no rattle when hauling. These 2 reasons are why it gets 2 stars from me. EVERYTHING else is a fail! #1 if you loose the receiver ball adapter, you will need to buy another, which is $xxx (and shipping time lost). It's design is totally proprietary. You cannot "borrow" a friend’s receiver or go to [moving company] or [hardware store] and get a new one off the shelf. #2 The ball receiver locks into place, but YOU must be sure to hear a "click" it makes. I did not do this correctly and lost my receiver ball, thankfully while I was not hauling anything. While this is all totally my fault, I have Never made that mistake with a standard square receiver, Ever. And remember, if you loose your ball adapter, $xxx. #3 The rubber plug that keeps the receive opening covered fell out. I'm not surprised, it faces directly down and is nearly impossible to take in and out regularly. #4 The wiring harness plug bracket that hold the plug for trailer connection is thin metal that bends with usage. It’s garbage, but it works okay. #5 Just a little inconvenient taking the hitch/chains on and off due to the hidden location, but that's not much of a con. #6 The aftermarket wiring harness failed in less than a year. I replaced it with the OEM wiring which is expensive ($xxxx), requires taking the rear bumper and interior off the car again, and also requires programing from the dealer ($xxx). #7 Cannot add a reverse wire to the aftermarket harness. Although the hitch instructions indicate I shouldn’t really ever need a 5th wire, low and behold a boat trailer I bought later on had a 5 wire plug and I could not upgrade the existing module. #8 With aftermarket wiring, the car doesn’t know you’re hauling a trailer. This is annoying when in reverse and the car constantly thinks you’re hitting something, or it signals you that there’s a car in your blind spot.
Pro
#1 Hard to see after installation, which is cosmetically appealing
#2 No receiver rattle when hauling
Now I have a stealth receiver and OEM wiring. FYI: The OEM hitch is a standard square receiver and is very well built.
Thanks for reading
by: Brian 06/11/2021
2020 Audi Q8
Fantastic fit and quality. Can’t wait for them to come out with one for my 2021 Land Rover Defender.
3
3
See what our Experts say about this Stealth Hitches Trailer Hitch
- What Replacement 2-Inch Receiver Accessory do I Need for My Stealth Hitch # 391AUDQ818T?I'm sorry to hear about your receiver accessory! Yes! We do carry the replacement you need for your Stealth Hitch # 391AUDQ818T. The replacement 2" receiver tube you need is the Replacement 2" Receiver Attachment for Stealth Hitches Rack Receiver or Trailer Hitch # 391RR2. It is important that this receiver (and the original one) is not designed for towing purposes. It can only be used to mount accessories like bike racks and cargo carriers.
view full answer... - Best Trailer Hitch Receiver For a 2024 Audi Q7The Stealth Hitches Hidden Trailer Hitch Receiver w/ Towing Kit # 391AUDQ818T is going to be our best option for your 2024 Audi Q7. This receiver allows you to completely remove either the ball mount or 2" receiver when not needed so you will not even see it when not needed. This kit also includes the wiring for a 7-way connection and an adapter for a 4-way flat which is the most commonly found connectors for trailers. I do recommend getting the Carrying Case # 391CASEC to store the ball...
view full answer...
Do you have a question about this Trailer Hitch?
Info for this part was:

Edited by:
Lindsey S

Video Edited:
Jacob T

Video Edited:
Jonathan Y

Updated by:
Wilson B

Updated by:
Mark S

Updated by:
Noah M

Updated by:
Manda E

Written by:
Alexander C
At etrailer.com we provide the best information available about the products we sell. We take the quality of our information seriously so that you can get the right part the first time. Let us know if anything is missing or if you have any questions.
Product Experts Available Now!
Call 1-800-940-8924
Sierra K.
1/4/2022
The programming process should be started before the installation of the parts. Please allow at least a week to make programming arrangements. Also, the purple wire is the reverse wire which is located in the middle of the 7 way. You should not have to add any additional wires.